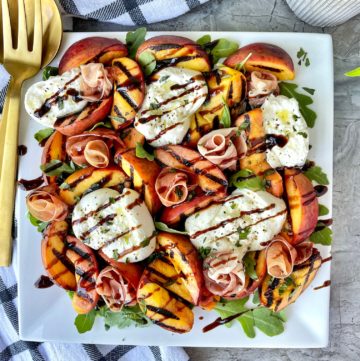
Grilled Peach and Burrata Salad
This grilled peach and burrata salad is the perfect summer appetizer or side dish. It features juicy peaches, creamy burrata, salty prosciutto and peppery arugula and is topped with a sweet balsamic glaze.
Servings: 6
Ingredients
- 5 peaches
- 4 2oz burrata balls
- 3 oz prosciutto
- 2 cups arugula
- 1 tbsp ghee melted
- 1 tsp olive oil
- 1 tbsp finely chopped fresh basil
- 2 tbsp balsamic glaze
- salt and pepper
Instructions
- Rinse peaches and cut peaches. If you are cooking the on a grill, cut the peaches into quarters, so they don't fall through the grates. If you are cooking the peaches on a grill pan, you can cut the peaches into fifths.
- Heat grill or grill pan to medium heat. Brush one side of each peach slice with ghee and place peaches ghee side down on the grill or pan. Grill peaches 3 minutes. Brush the other side with ghee, flip peaches and grill an additional 2-3 minutes. Remove peaches from grill or pan and allow to cool.
- On large serving platter, spread arugula out into an even layer. Top arugula with peach slices. Split open the balls of burrata with your hands and place on platter amongst the grilled peaches.
- Make prosciutto roses (see instructions below in notes) and place them in any gaps left on the platter between the peaches and burrata. Drizzle olive oil over each piece of burrata. Grind freshly cracked black pepper and sea salt over the burrata as well.
- Garnish the dish with finely chopped fresh basil and a drizzle of balsamic glaze.
Notes
To make prosciutto roses:
- Slice prosciutto and cut it in half lengthwise.
- Start with one end of the prosciutto and begin to roll it up. I like to hold the rose in one hand and roll with the other. Don't roll it on a cutting board or it will be too tight.
- Ensure that the first few rolls (what will be the center of the rose) are taller than the next few rolls, and so on until the piece of prosciutto is completely rolled up.
- While holding the prosciutto rose in one hand, use your other hand to gently pull on the outer edges to separate the layers of 'petals' and make the rose appear fuller.
- Don't stress about it looking perfect! In fact, the faster and 'messier' you roll, the more natural the prosciutto roses look!